

C Riser Handling
- Atleta de Aventura
- 3 de jan. de 2022
- 3 min de leitura

The risers evolution to a more balanced handling
Despite the fact that riding by the C riser is a technique, many factories still DO NOT OFFER a suspension with a really effective design for this type of handling and, in other hand, some brands just RECOMMEND NOT TO handle by C risers in some of their paraglider models.
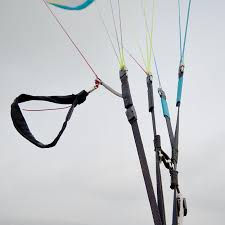
In the image we see a traditional suspension with 3 bands (A, A¹, B and C), in which we can see that band C is independent of band B in terms of actuation, being attached to it only at the bottom of the suspension. In this suspension design, handling on the C riser is possible, but less effective and not that harmonious than on a riser designed for this type of handling.
In this type of suspension, due to the distance between the line´s galleries B and C, a more intense action on band C leads to a great deformation of the airfoil and can, in extreme cases, lead to a parachute or even a stall. Some 3 risers paragliders have 4 line´s galleries, with the C line having a pyramidal connection with the canopy and suspended by the C and D galleries.
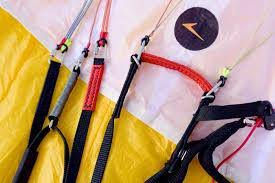
This image demonstrates a creative idea from the Swing manufacturer with a 4 riser´s suspension. They created a bridge between bands C and D and the pilot could correct directions and even act a little more smoothly in handling than using the brakes.
It is necessary to remember that riding by the C (and D) tether began before the actual evolution of the suspensions so that the pilots had an effective piloting through it. The practice of this technique, as in many other cases in human history, led to the perception of the need to evolve the equipment.

The designers realized the problem generated by C band acting independently and directly on gallery C and began to develop suspension designs in which the action on C band would function integrated with the rest of the suspension.
The objective was to generate a more effective and harmonious actuation on the airfoil, delivering more performance and minimizing canopy deformations. Some factories, as is always the case in the consumer world, started by simply placing accessories on the C bands, but without any engineering adaptation to the suspension.

The first and even more present risers adjusted in its design for an integration with bands B and A are simple and work by adjusting the tension balance across the bands.
Note in the photo above that the pilot can act on band C, up to a certain point, without affecting the tension balance with bands B and A. From this certain point the actuation on C band starts to affect B band and, on some models, the A¹ too. One very important thing to say about riding on C risers is that there is a technique to be known and respected: YOU DON´T PULL C RISER STRAIGHT DOWN. The C riser must be pulled back and down, which generates a 45° actuation angle (exactly as pictured above). Some manufacturers have taken more steps in the evolution of suspensions for a more precise riding by the C rise and I believe that we will still see several evolutions in the market until the end of this 2021 season.

Note the suspension in this image. Note that there is a connection of the upper intermediate part of C band with a movable anchor point on B band and a fixed anchor point at the lower intermediate part of A band. See that the starting point of the connection on C band is exactly at the base of the handle reserved for the pilot to hold and handle by C riser and that the integration design makes a nice load distribution across the three risers when band C is actuated.

In this image a demonstration of actuation on C riser in a more modern suspension already prepared for a more precise riding by the band C. Note that the steering technique of the actuation is the same, backwards and downwards at an angle of 45º.
Well, I believe that the images above will help you to better understand the concept of flying the C riser and can also help your understanding of your own paraglider. Good and long flights to all of you guys,
CB